
I decided to split the tute for the 'Koi Pond' wall hanging in two parts. First the lilies, then koi PP pattern.
Zdecydowalam, ze tutek na makatke z karpiem koi podziele na dwie czesci. Najpierw lilie, potem wzor PP.

You can use whichever fabric you choose. Fo my lilies I used: for white ones - white and dirty pink linen, for pink one - dirty pink linen and cotton in darker pink. Here I will show you how to make the white lily (to make the pink one, you reduce one row of big petals; the rest is the same).
Lilie mozecie zrobic z jakiego materialu chcecie i w jakich kolorach wam sie podoba. Ja uzylam cienkiego plotna (bialego i brudnorozowego) do bialych lilii i brudnorozowego plotna z rozowa ciemniejsza bawelna do zrobienia rozowej lilii. W tutku bedzie pokazane jak zrobic biala lilie (rozowa ma po prostu jeden rzad duzych platkow mniej).

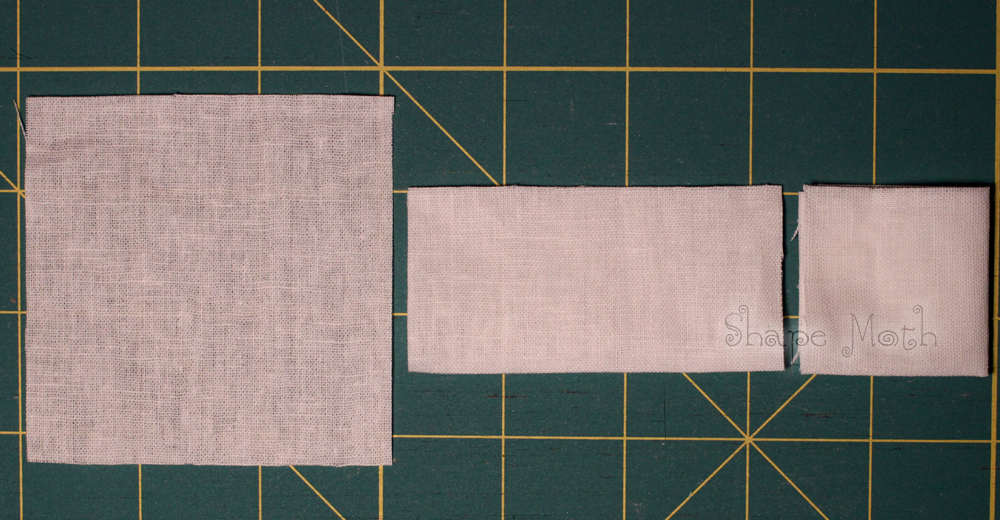
You need 16 squares 3"x3" (white ones) and 8 squares 2"2" (pink).
Potrzebne bedzie 16 wiekszych kwadratow ~7,6cm x 7,6cm (3cale x 3cale) i 8 mniejszych ~5cm x 5cm (2cale x 2cale).

Zaczynamy od zlozenia duzych kwadratow na 4:
Each of those folded squares fold in a shape of petals:
Kazdy z tych zlozonych kwadratow skladamy na ksztalt platka kwiatu:


String folded petals and cut the end straight:

For one row you need 8 petals:
8 platkow stanowi jeden rzad:

Repeat to make another row of 8 big petals (for the pink lily omit this step). Sew two rows together in a way that the flower petals of the upper row lay between the ones from the lower row:
Teraz trzeba tylko powtorzyc czynnosci, zeby zrobic nastepny rzad 8 platkow (przy robieniu rozowej lilii pomijamy ten etap). Zszywamy dwa rzedy razem w ten sposob, zeby platki ukladaly sie naprzemiennie:

Fold smaller squares in 4 (the same way like big squares) and fold them in the shape of flower petals, but this time slightly different, 'cause they are smaller:
Male kwadraty skladamy na 4 (tak samo jak duze) i tworzymy z nich platki kwiatu ale tym razem skladamy je troche inaczej, bo sa mniejsze:

Repeat to make 8 smaller petals, sew the last row on the top of the others:
Po zrobieniu 8 malych platkow, doszyj ostatni rzad do dwoch duzych:

Now it's time to take care of the bottom of the flower:
Teraz czas sie zajac spodem lilii:

Use a piece of thick felt or some thick and stiff polyester stabiliser. Cut circle big enough to cover the hole and all the stitches and sew it on the flower:
Do zamaskowania sciegow i wszystkiego co zamaskowac chcemy, potrzebny bedzie kawalek sztywnego filcu lub grubej i sztywnej fizeliny. Kolko powinno byc na tyle duze, zeby wszytko bylo zakryte:

Now comes the tricky part (and that's why you need something stiff to stabilise the bottom). Try to catch the inner edges of the smallest petals with some thicker thread and pull them down, sewing through the stabiliser on the bottom. Do it in few places to raise the petals up (give some dimention to the flower):
Teraz bedzie troche kombinowania. Grubsza nitka czy kordonek beda do tego najlepsze. Trzeba 'wcisnac' srodek kwiatu do dolu, zeby platki sie uniosly. Przeszywamy male platki (ich wewnetrzne krawedzie) i przeciagamy nitke przez to kolko, ktore przyszylismy na spodzie (dlatego lepiej, zeby bylo z jakiegso sztywnego materialu, zeby nie zmienilo ksztaltu). I tak w kilku miejscach, zeby konce platkow rownomiernie sie uniosly:

I fill the hole inside the lily with some batting. It makes it easier to sew beads later:

Cut a circle from yellow felt (big enough to cover the seams) and glue it (especially on the edges) on the top of the flower. I've hand sewn some beads on the middle later, unfortunatelly I forgot to make photos from the process:
Wycinamy kolko z zoltego filcu (ny tyle duze, zeby przykrylo krawedzie i sciegi) i przyklejamy, tworzac srodek kwiatowy. Ja doszylam jeszcze na koniec koraliki w srodku, ale juz zadnych zdjec nie robilam:

I would love to see your lilies if you will make any!
Z radoscia zobacze wasze lilie jesli sie zdecydujecie je zrobic!


Śliczności.
ReplyDeleteLilie mnie zachwyciły, tym bardzej dziękuję za tutorial, postaram się kiedyś skorzystać :)
ReplyDeleteŚliczne lilie - dziękuję za kursik :-)
ReplyDeletepozdrawiam ciepło
So beautiful... At first I thought they were real...
ReplyDeleteThank you for sharing. They are gorgeous!
ReplyDeleteKirie, your work is amazing, and inspiring! Glad I found you. :) ~ Lynda
ReplyDeleteThe lilies looked like what you would find on a wedding cake - extraordinary!
ReplyDeleteŚliczne:) Takie proste w wykonaniu, a jaki efekt!
ReplyDeleteReally gorgeous! Using squares and cut the edge is cool improvement :-)
ReplyDeleteo ja:D super! tak sie ciesze ze tego tutka zrobilas! na pewno w przerwie miedzysemestralnej z niego skorzystam! dziekuje! :D
ReplyDeleteBardzo Ci dziękuję Joasiu za tego tutka!!! Właśnie miałam Cię zapytać jak się robi takie przepiękne lilie... a to takie proste:) Pozdrawiam ciepło!
ReplyDeleteYay, thank you so much for sharing the technique to make the flowers! I can't wait to give it a try!
ReplyDeleteOh, these are just so beautiful. I cannot thank you enough for sharing this tutorial.
ReplyDeleteDziękuję - skorzystam :)
ReplyDeleteThank you for sharing!
ReplyDeleteGracias por compartir el tutorial.
ReplyDeleteYour blog is just beautiful. You make the lilies seem so easy to create! Maybe I will have to try one.
ReplyDeletethank you for sharing..
ReplyDeleteVery nice tutorial. Thank you for sharing this fun & so, so cute design. I'm a new follower! haberdashery
ReplyDelete