
Well, time for my first tutorial. How to sew pear cup coasters (including bias tape witch I use to finish edges)...
1. Fabrics are chosen. I try to combine three different fabrics in matching colours for the front, and some thick cotton/linen on the back side. I have my pattern which I always use cut from the paper. Additionally, I was preparing a template for cutting from different fabrics (white one). Not to waste too much.

2. Cut the pieces of fabrics in correct sizes:

3. Sew them together and press the seams on the side of the darker fabric:

4. Check again if the size is O.K. to avoid problems later (this is a tip for the beginners, pro's - please do not laugh ;) ).

5. Then, I draw the shape of the pear on prepared fabrics (I use water removable marker):

6. Preparing the sandwich. I chose Freudenberg Vliseline 279 and S80. To give it volume and make it rigid:

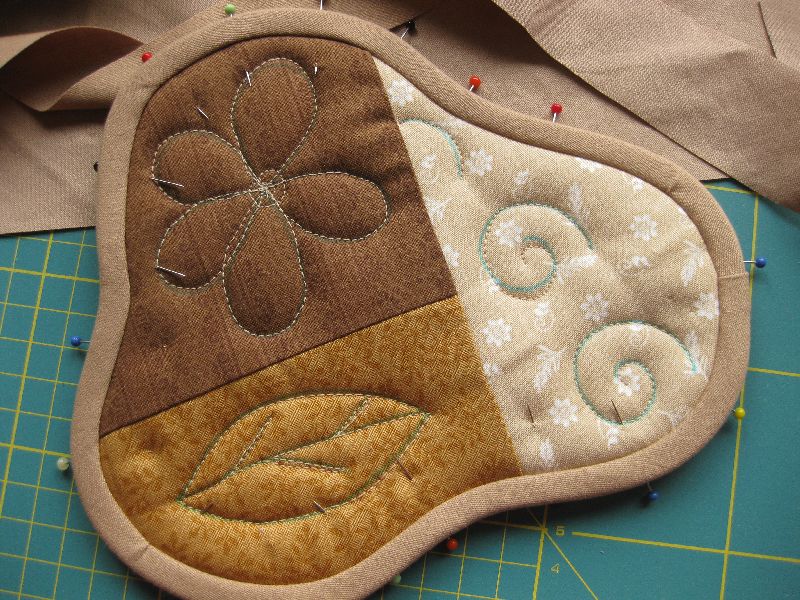
7. Pin the sandwich together:

8. At first I sew the outline, for the elements to stay on the place. I use quilting foot. Standard one (for me) pulls the fabric to much:


9. Also with the help of quilting foot I quilt some pattern on the top. You can quilt this way or you can choose to sew lines through the whole cup coaster (see the previous ones which I made):

10. I trim the edges a little bit:

11. Cut bias tape from the fabric which you want to use.
First I cut a big square. Than cut it into 2 triangles. Cut the bias tape from the longest side of the triangle. The bigger the sqare is, the better - you will have longer bias tape.
I have the whole piece of beige/brown cotton just for bias tapes. It's perfect for it.

12. I fold the begining of the tape and slowly sew it to the edge of the cup coaster. You shouldn't pull on the tape to much while sewing. Just try to bend the bias tape according to the shape and the curves while you sew. And really take your time. At the beginning it's not easy.


And that's how the end effect should look like:


13. Turn the tape to the back just to see if everything went well:

This is the back side of the coaster:

14. Fold the tape to hide the edge and pin it:

I pin first the whole border.

Now front looks much better:
15. Hand sew the border to the back of the coaster. Try to do it this way, that the thread is not visible (I still have to do it with those three).
16. Now, the leaves. Just draw some on the back side of the fabric which you chose, fold the fabric in two and sew. Remember to leave some part open to turn the fabric later. I leave the base of the leaf open.

17. After turning the leaf I put some of the rests of the vlieseline inside, to give it some volume:


18. Sew a leaf pattern:

19. Just some matching buttons to add and some holders fot hanging the cup coasters (do not have those yet). Those elements I sew by hand with some thick thread. Try to hide the knots under the buttons/leaves.

I will show you mine when I will be 100% finished with them. If this tutorial helped you a little bit at least, please let me know :) I love to read comments. And if you used it to make your own cup coasters I would be glad to see them - just leave me some link in the comment or send me photos on email. I will post the photos on my blog ^.^
Wish you all a good evening :)

Thank you for showing how to do these adorable coasters. I love them!!
ReplyDeleteawwww you had made a tutorial for these lovelies!thankyou soooo much!
ReplyDeleteThese are very nice! I love the shape...something other than round or square is wonderful! Thank you!
ReplyDeleteHow cute! Thanks for sharing.
ReplyDeleteThese are absolutely adorable! I love them! I need to see if I have a quilting foot so I can do fun designs like that.
ReplyDeleteLove your design and colours choices! thanks for the tutorial.
ReplyDeleteWidziałam, je u Ciebie na blogu wcześniej. Fajnie, że pokazałaś jak wszyć lamówkę ( z tym zawsze mam problem) Pozdrawiam
ReplyDeleteSuper kursik!!! W tak przejrzysty sposób wytłumaczyłaś jak wszyć lamówkę,że aż mam ochotę spróbować:)Gruszki wyszły nieziemsko smaczne , doskonałe:)
ReplyDeleteKirie, thank you for sharing your tutorial, it is great! I inspired by you...
ReplyDeletehttp://designama.blogspot.com/2011/12/podlozky-pod-hrnicky.html#comment-form
Wish I had the paper pear pattern. I have no idea how big to make anything. Can you post the pattern so we can download.
ReplyDeleteSuper :) przepiękne :)
ReplyDeleteI am with you Anonymous; would love to have the pattern. I am horrible at trying to draw anything. I love this so much; I am going to see if my daughter can draw me up something.
ReplyDeleteLindo! obrigada. Mas tb não sou boa em desenho, logo, seria ótimo se vc disponibiliza-se para nós o molde. Bjs
ReplyDeleteI like it , simple and easy, thsnks for sharing :)
ReplyDeleteThank you, happy 2014!
ReplyDelete