
You can find the list of tutorials by clicking on the picture

With one week of delay we're starting next Tutorial Tuesday. This time it's about painting on fabric. I will paint the applique which I prepared last time:
Z tygodniowym opoznieniem ale jest :) Nastepny wtorkowy tutorial. Tym razem o malowaniu aplikacji ktora przygotowalam w poprzednim tutku:
Starting with black outlines. Important thing which could help you paint small details and keep the painted line straight - dip only the tip of the brush in the paint. Not the whole part until the metal. And clean the brush quite often while you paint to remove older, drying paint:
Zaczniemy od konturow. Mala wskazowka, ktora ulatwi wam malowanie detali i prostych linii - wystarczy umoczyc czubek pedzelka w farbie. Nie trzeba brudzic go calego az do tej metalowej czesci ;) Lepiej czesciej nabierac male ilosci farby. No i polecam myc pedzelek podczas malowania wielokrotnie. Zapobiega to nawarstwianiu sie schnacej farby.

While painting the outlines, paint only the edges of the appliqe (not the background). I started with the flowers' petals :
Zaczynamy od konturow platkow. Ja maluje tylko brzegi aplikacji (starajac sie nie pobrudzic tla):

after you are finished with the petals and the flower buds, paint the insides of the flowers in yellow:
Po pomalowaniu wszystkich kwiatow maluje slupki na zolto:

Now it's time to highlight the middle parts (I used too dark fabric, lighter colour would look much better).
I mixed some white and red paint. The important part about highlighting is that it needs several layers of different tones of one colour. This way you can get a nice effect.
What you can do is just mix some paint for the first layer (ex. white and red), for the next layer add more white, and do the same for another layer. You can see on the photo, that the first layer which I painted is not much brighter from the colour of the fabric:
Teraz bedzie troche trudniej. Trzeba pocieniowac srodki kwiatow. Ja uzylam troche zbyt ciemnego materialu (jasniejszy wygladalby o wiele ciekawiej).
Wazne w cieniowaniu jest to, by uzyc kilku warst farby zaczynajac od najciemniejszej na spodzie. Zmieszalam troche bialej i czerwonej farby (nie mam gotowego rozowego) i pomalowalam srodki. Kolor farby nie jest duzo jasniejszy od materialu na ktorym malowalam ale to dopiero pierwsza warstwa:

Just that you can see it better:
Powiekszenie:

I added more white to the paint mix which I had and painted few thin lines on the top of the first layer of paint:
Dodalam troche wiecej bialego do tego mixuktorym malowalam pierwsza warstwe i namalowalam kilka bialych linii dla rozjasnienia:

and added more white and painted again:
i znowu dodalam troche bialego i pomalowalam srodki kwoatow:

Then I painted the tops of petals with some white/red mix (the colour wasn't the one which I wanted to get, but I didn't buy any pink paint, so it had to be enough) and highlighted the petals with some white lines:
Nastepnie pomalowalam czubki platkow na rozowo (bialy+czerwony) i rozjasnilam bialymi liniami:

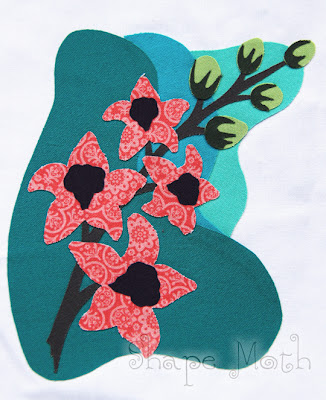
Finished flowers:
Tak wygladaja skonczone kwiaty:

I also highlighted the flower buds:
Rozjasnilam tez paki kwiatowe (a raczej staralam sie i mi nie wyszlo ale coz... farby juz nie zmyje...):

And the picture is ready... maybe those flowers were not the best example of how to paint on fabric. It would look much nicer on some cartoon character...
You know the basics of what I do with the applique now so you can create whatever you want :)
I gotowe. Moze tak fajnego efektu nie ma jak malowanie np. postaci z kreskowki ale podstawy sa takie same :) Teraz mozecie tworzyc dowolne aplikacje i malowac na nich co chcecie :)

I know you may have previously mentioned in another post, but what kind of paint do you use? Is it fabric paint or something else?
ReplyDeleteBrzmi banalnie prosto, ale wiem że proste nie jest. :) Pamiętam jak kiedyś powiedziałaś, że jesteś leń... no jakoś się nie sprawdza! Ogrom roboty już włożyłaś w tę aplikację, a przecież to jeszcze nie koniec.
ReplyDeleteŚwietny tutorial. Masz zdolności do wszystkiego. Szczerze podziwiam :)
ReplyDeleteVery nice! I can't wait to work on it this week. Thank you!!
ReplyDeletesuper, a Twój storczyk normalnie prześliczny :D
ReplyDeleteIt's very helpful to see the technique you used to add such nice details! I was also wondering what type of paint you are using.
ReplyDeleteDzięki za kursik :-)) dawno oj dawno nie malowałam na materiale chyba trza od nowa zacząć szczególnie ze teraz jest naprawdę mnóstwo produktów , dzięki jeszcze raz:-)
ReplyDeleteDotąd tylko malowałam na materiale, nie wpadłam na to, by malować też aplikacje, dzięki - świetnie przygotowałaś kursik:)
ReplyDeleteLindos trabalhos! Um abraço.
ReplyDeleteTutorial super :) Mam tylko małe pytanie - zakupione przeze mnie farby tej samej firmy, której używasz są bardzo gęste. Łatwo namalować nos czy oko lalce, ale do większych rysunków ta gęsta farba się nie nadaje. Można ją jakoś rozcieńczyć?
ReplyDeletePozdrawiam Agata